
টব পরিবর্তনের সঠিক পদ্ধতি: একজন অভিজ্ঞ নার্সারি ম্যানের গোপন ট্রিকস ও স্টেপ-বাই-স্টেপ গাইড
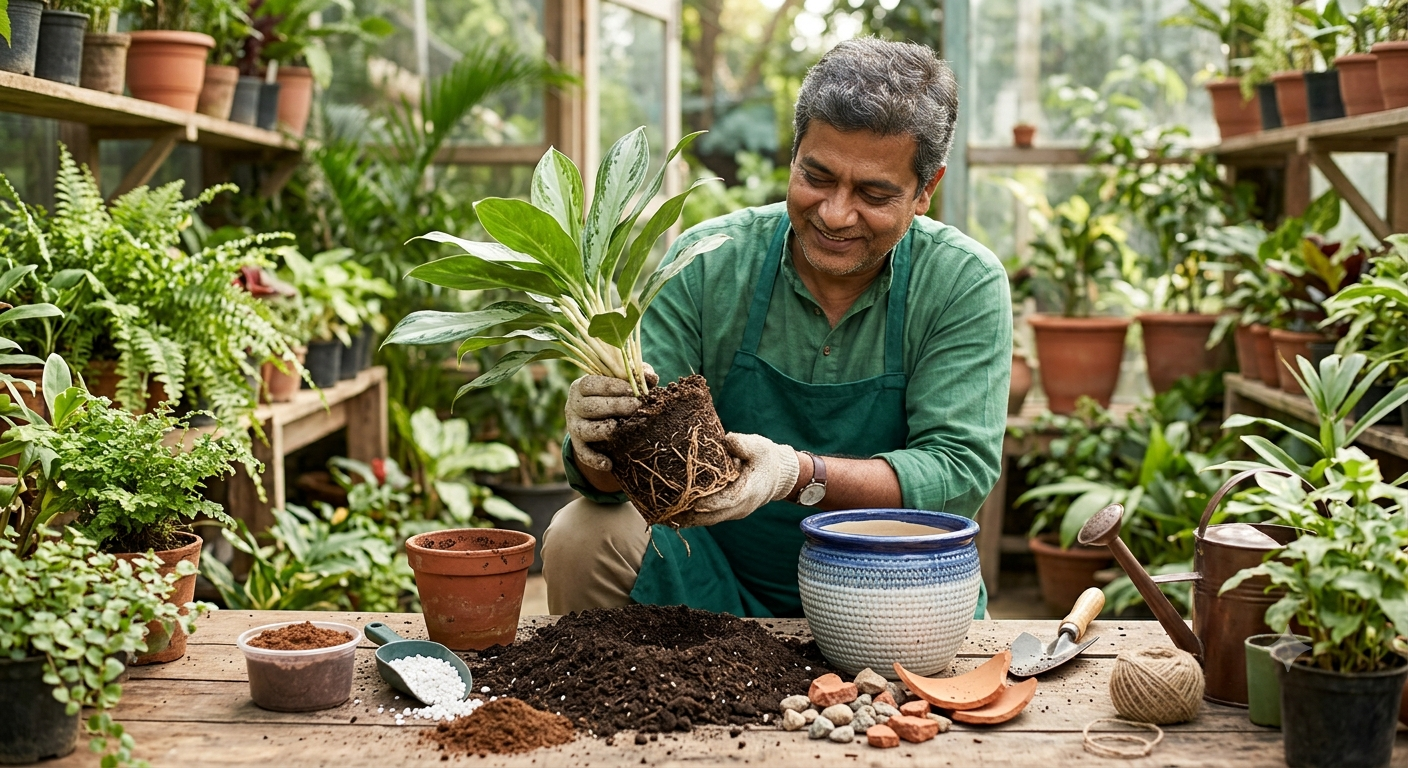
আজকে আমি একজন প্রফেশনাল নার্সারি ম্যান হিসেবে আমার কিছু সিক্রেট ট্রিকস এবং স্টেপ-বাই-স্টেপ গাইড শেয়ার করব, যা আপনার গাছের বৃদ্ধি দ্বিগুণ করে দেবে এবং গাছ মারা যাওয়ার ঝুঁকি একদম শূন্যে নামিয়ে আনবে।
১. গাছ কি সত্যিই টব পরিবর্তন চায়? (রুট-বাউন্ড চেনার উপায়)
সবচেয়ে বড় ভুল হলো অসময়ে টব পরিবর্তন করা। গাছকে বারবার বিরক্ত করলে সে শকে (Repotting Shock) চলে যায়। আপনার গাছটি নতুন টব চাইছে কিনা, তা বোঝার ৩টি পাকা লক্ষণ:
- নিচের ফুটো দিয়ে শিকড় বের হওয়া: টবের ড্রেনেজ হোল বা নিচের ফুটো দিয়ে যদি শিকড় উঁকি মারে, তবে বুঝবেন ভেতরে আর মাটির জায়গা নেই, শুধু শিকড় গিজগিজ করছে।
- পানি দেওয়ার সাথে সাথে নিচে নেমে যাওয়া: টবে পানি দেওয়ার কয়েক সেকেন্ডের মধ্যে যদি সব পানি নিচে নেমে যায় এবং মাটি সবসময় শুকনো খটখটে লাগে, তার মানে টবে মাটির চেয়ে শিকড়ের পরিমাণ বেশি হয়ে গেছে।
- গাছের বৃদ্ধি থমকে যাওয়া: বসন্ত বা বর্ষাকালে (যা গাছের বৃদ্ধির সময়) সঠিক সার ও পানি দেওয়ার পরেও যদি গাছের নতুন পাতা না গজায়, তবে বুঝবেন তার ঘর ছোট হয়ে গেছে।
২. নতুন টব ও মাটির ஜাদুকরী অনুপাত
নতুন টব বাছাই করার একটা গোল্ডেন রুল আছে। বর্তমান টবের চেয়ে সর্বোচ্চ ১ থেকে ২ ইঞ্চি বড় ব্যাসের টব নেবেন। একবারে অনেক বড় টব নিলে মাটিতে অতিরিক্ত পানি জমে শিকড় পচে (Root Rot) গাছ মারা যাবে।
ইনডোর প্ল্যান্টের জন্য সাধারণ বাগানের আঠালো মাটি বিষের মতো। মাটি হতে হবে ঝুরঝুরে ও বাতাস চলাচলকারী (Well-draining)।
- দোআঁশ মাটি: ৪০%
- কোকোপিট বা শুকনা পাতার গুঁড়ো: ৩০% (এটি আন্তরতা ধরে রাখে)
- ভার্মিকম্পোস্ট বা কেঁচো সার: ২০% (গাছের প্রাথমিক খাবার)
- নদীর সাদা বালু বা পার্লাইট: ১০% (পানি নিষ্কাশন সহজ করার জন্য)
- এক মুঠো নিম খৈল: (শিকড়ে ছত্রাক বা পোকা লাগা বন্ধ করতে)
৩. স্টেপ-বাই-স্টেপ টব পরিবর্তনের সঠিক নিয়ম
যেদিন টব পরিবর্তন করবেন, তার আগের দিন গাছে হালকা পানি দিয়ে রাখুন। এতে মাটি নরম থাকবে এবং টব থেকে গাছটি শিকড় অক্ষত রেখে খুব সহজে বাটির মতো বের হয়ে আসবে। শুকনো অবস্থায় টানলে শিকড় ছিঁড়ে যেতে পারে।
নতুন টবের নিচে ১ বা ২ টি ফুটো থাকা বাধ্যতামূলক। ফুটোটির ওপর একটি ভাঙা টবের টুকরো বা খোলামকুচি উপুড় করে দিন। তার ওপর ১ ইঞ্চি পরিমাণ ছোট ইটের খোয়া বা নুড়ি পাথরের একটি স্তর তৈরি করুন। এর ফলে অতিরিক্ত পানি খুব সহজে বের হয়ে যাবে কিন্তু টবের দামি মাটি ধুয়ে যাবে না।
গাছের গোড়া ধরে জোর করে টানবেন না। টবটিকে আলতো করে কাত করে চারপাশ থেকে একটু চাপ দিন বা থাপড়ান। এবার গাছের গোড়ার মাটির অংশটি (Root Ball) ধরে টান দিলে পুরো কেকের মতো গাছটি বের হয়ে আসবে।
গাছ বের করার পর যদি দেখেন শিকড়গুলো গোল গোল হয়ে জট পাকিয়ে গেছে, তবে আঙুল দিয়ে আলতো করে নিচের কিছু মাটি আলগা করে দিন। জট পাকানো মোটা শিকড়গুলো একটু সোজা করে দিন, যাতে তারা নতুন মাটিতে ছড়াতে পারে। কোনো শিকড় পচা বা কালো দেখলে জীবাণুমুক্ত কাঁচি দিয়ে কেটে দিন।
নতুন টবের এক-তৃতীয়াংশ (1/3) অংশ আমাদের তৈরি করা পটিং মিক্স দিয়ে পূরণ করুন। এবার গাছটিকে একদম মাঝখানে সোজা করে বসান। খেয়াল রাখবেন, গাছের গোড়া যেন টবের একদম ওপরে না থাকে, আবার খুব বেশি নিচেও না ডুবে যায়। টবের ওপরের অংশ থেকে অন্তত ১ ইঞ্চি জায়গা খালি রাখুন যেন পানি ও সার দেওয়ার সুবিধা হয়। এবার চারপাশ থেকে মাটি দিয়ে আলতো হাতে চেপে দিন, যাতে ভেতরে কোনো বাতাস বা এয়ার পকেট (Air Pocket) না থাকে।
৪. টব পরিবর্তনের পর "পোস্ট-অপারেশন" কেয়ার (সবচেয়ে গুরুত্বপূর্ণ)
অপারেশনের পর রোগীকে যেমন আইসিইউ-তে রাখা হয়, গাছের ক্ষেত্রেও তাই। টব পরিবর্তনের পরপরই ৩টি কাজ অবশ্যই করবেন:
- ভরপুর পানি দিন: প্রথমবার এমনভাবে পানি দিন যেন টবের নিচের ফুটো দিয়ে পানি বের হয়ে যায়। এতে নতুন মাটি পুরোপুরি সেট হয়ে যাবে।
- ছায়ায় রাখুন (Crucial): গাছটিকে অন্তত ৭ থেকে ১০ দিন সরাসরি রোদ থেকে দূরে, ঘরের উজ্জ্বল কিন্তু ঠাণ্ডা কোনো ছায়াযুক্ত জায়গায় রাখুন। এই সময়ে রোদে দিলে গাছ শকে মারা যাবে।
- সার দেওয়া বন্ধ রাখুন: নতুন মাটিতে অলরেডি পুষ্টি আছে। তাই নতুন টব পরিবর্তনের পর অন্তত ১ মাস কোনো প্রকার রাসায়নিক বা কড়া তরল সার দেবেন না।
🙋♂️ সাধারণ জিজ্ঞাসা (FAQ)
উত্তর: যেকোনো গাছের টব পরিবর্তনের সেরা সময় হলো বসন্তকাল (ফেব্রুয়ারি-মার্চ) অথবা বর্ষাকাল (জুন-জুলাই)। তীব্র গরম বা অতিরিক্ত শীতে কখনো টব পরিবর্তন করবেন না।
উত্তর: নতুনদের জন্য মাটির টব (Terracotta) সবচেয়ে নিরাপদ। কারণ মাটির গায়ে ছোট ছোট ছিদ্র থাকে যা অতিরিক্ত পানি শুষে নেয়। প্লাস্টিক বা সিরামিকের টব দেখতে সুন্দর হলেও এতে পানি জমে থাকার ভয় বেশি থাকে।
The Correct Method of Repotting: Secret Tricks and Step-by-Step Guide from an Experienced Nurseryman
Today, as a professional nurseryman, I am going to share some of my secret tricks and a step-by-step guide that will double your plant's growth and bring the risk of plant death down to absolute zero.
1. Does the Plant Really Need a New Pot? (How to Identify a Root-Bound Plant)
The biggest mistake is repotting at the wrong time. Disturbing the plant repeatedly will push it into Repotting Shock. Here are 3 clear signs that your plant is asking for a new home:
- Roots emerging from the bottom hole: If you see roots peeking through the pot's drainage holes, it means there is no more room for soil inside; it is tightly packed with roots.
- Water draining out instantly: If all the water rushes straight out of the bottom within a few seconds of watering, and the soil constantly feels bone dry, it indicates that the volume of roots has far surpassed the amount of soil.
- Stunted plant growth: If no new leaves emerge during spring or monsoon (the primary growing seasons) despite providing proper fertilizer and water, it means the plant has outgrown its home.
2. The Magical Ratio of the New Pot and Soil Mix
There is a golden rule for choosing a new pot: select one that is at most 1 to 2 inches larger in diameter than the current pot. Moving it to an excessively large pot at once will cause water to pool in the soil, leading to Root Rot and plant death.
For indoor plants, ordinary, sticky garden soil is like poison. The potting mix must be loose, airy, and well-draining.
- Loam Soil: 40%
- Cocopeat or Dry Leaf Mold: 30% (retains the necessary moisture)
- Vermicompost (Earthworm Castings): 20% (provides initial nutrition)
- White River Sand or Perlite: 10% (ensures effortless drainage)
- A handful of Neem Cake Powder: (prevents fungal infections and root pests)
3. Step-by-Step Guide to Correct Repotting
Lightly water your plant the day before you plan to repot it. This keeps the soil soft and cohesive, allowing the root ball to slide out effortlessly like a molded cake while keeping the roots perfectly intact. Pulling it from dry soil can cause critical root tears.
It is mandatory for the new pot to have 1 or 2 drainage holes. Place a broken terracotta shard or piece of old pot upside down over the hole. Spread a 1-inch layer of small gravel or crushed bricks over it. This allows excess water to escape instantly without washing away your premium soil.
Never yank the plant out forcefully by its stem. Tilt the pot sideways and gently tap or squeeze the outer walls. Now, support the root ball at the base and pull gently; the entire plant will glide out cleanly like a cake.
Once the plant is out, if you notice the roots are tightly coiled and tangled, use your fingers to gently loosen the outer soil. Straighten out the thick, bound roots so they can easily spread into the new mix. If you spot any mushy, black, or rotten roots, snip them off using sanitized scissors.
Fill one-third (1/3) of the new pot with our custom potting mix. Position the plant perfectly upright right in the center. Ensure the plant's base is neither sitting too high nor buried too deeply. Leave at least 1 inch of empty space from the top lip of the pot to facilitate seamless watering and fertilizing. Fill the sides with soil and pat it down gently to eliminate any trapped air pockets.
4. Post-Operative Care (The Most Crucial Phase)
Just like a patient is closely monitored in the ICU after surgery, your plant needs special care. Always follow these 3 rules immediately after repotting:
- Water Thoroughly: Water generously the first time until you see it freely draining out from the bottom holes. This ensures the new soil settles perfectly around the roots.
- Keep in Shade (Crucial): Keep the plant away from direct sunlight for at least 7 to 10 days. Place it in a bright, cool, and well-ventilated shaded area indoors. Direct sun exposure during this shock phase can kill the plant.
- Hold the Fertilizers: The fresh potting mix is already packed with rich nutrients. Do not apply any chemical or heavy liquid fertilizers for at least 1 month post-repotting.
🙋♂️ Frequently Asked Questions (FAQ)
A: The absolute best time for repotting is during Spring (February–March) or Monsoon (June–July). Avoid repotting during extreme peak summer heat or freezing winter months.
A: For beginners, clay pots (Terracotta) are the safest bet. Clay is porous, allowing the pot to breathe and naturally absorb excess water. While plastic or ceramic pots look premium, they trap moisture easily, increasing the risk of overwatering.




0 Comments